Dental veneers are a popular cosmetic dentistry procedure, known for their transformative effects on smiles. In this comprehensive guide, we will explore the dental veneers process, the issues it can resolve, and the step-by-step procedure involved. We'll also address some frequently asked questions to help you understand what to expect.
Dental veneers are a versatile solution that can address a range of dental issues, including:
Dental veneers can be used to create the appearance of straighter teeth, giving you a uniform and attractive smile without the need for orthodontic treatment.
If you have minor dental misalignment or crooked teeth, veneers can provide the illusion of a well-aligned smile, making them an excellent choice for those seeking quick results.
Veneers are effective in covering severe tooth discoloration that may not respond well to traditional teeth whitening methods. They can help you achieve a bright, white smile.
Chipped or damaged teeth can be restored with veneers, which not only repair the damage but also improve the appearance of your teeth.
The dental veneer procedure typically involves the following steps:
Step 1: Planning and Diagnosis
The diagnostic and planning process for a dental porcelain veneer typically begins with a thorough examination by a dentist. During this examination, the dentist assesses the patient's oral health, discusses their aesthetic goals, and takes impressions or digital scans of the teeth. These impressions are used to create precise models and, in some cases, digital simulations to visualize the final outcome. The dentist then collaborates with the patient to choose the appropriate color, shape, and size of the veneer. The entire process ensures a tailored and esthetically pleasing outcome, taking into account the patient's unique dental needs and preferences.
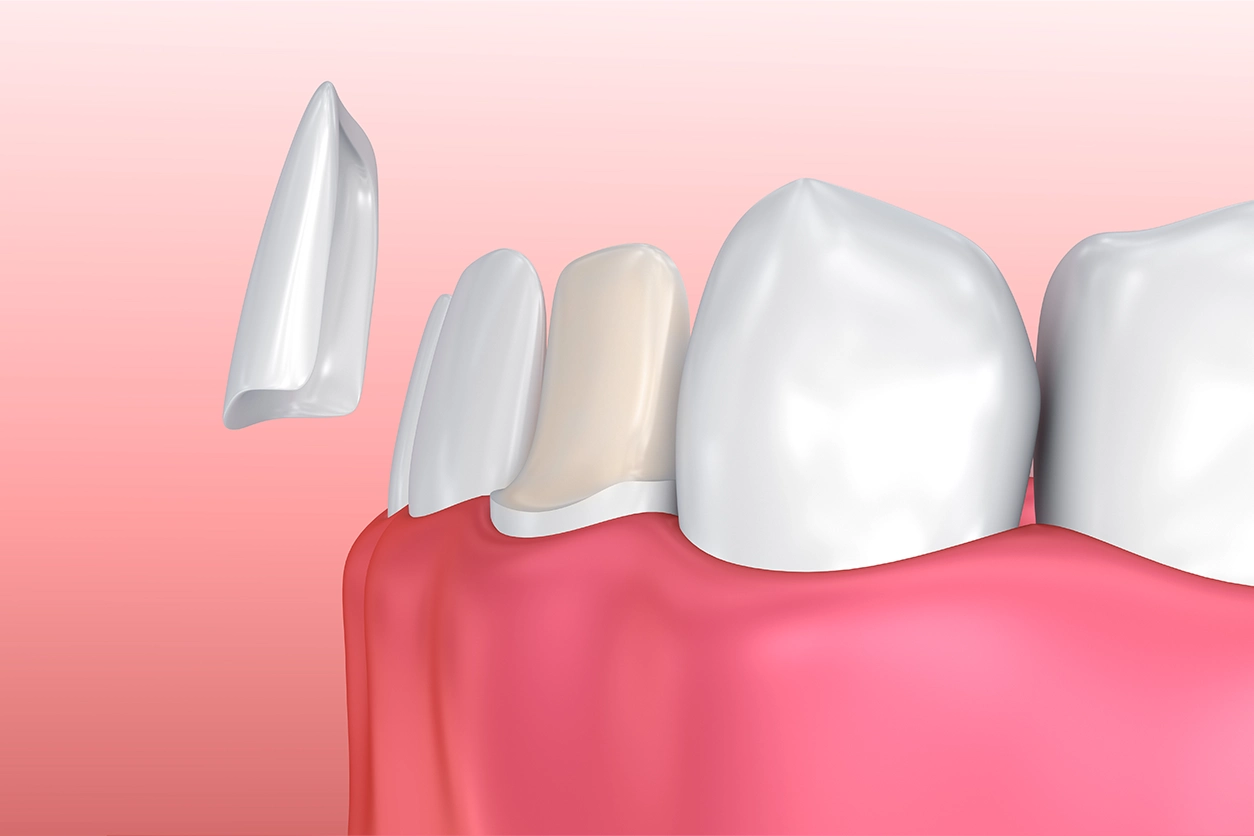
Step 2: Shaping of the Tooth that Will Receive the Veneer
To ensure a proper fit and natural appearance, a small portion of the tooth's enamel is removed. This is usually about half a millimeter of enamel, roughly the thickness of the veneer that will be placed.
Step 2: Selecting the Shade for the Dental Veneer
Choosing the right shade is crucial to match the veneer with your natural teeth. Your dentist will help you select the most appropriate color to achieve a seamless blend.
Step 3: Taking an Impression of the Teeth
An impression or mold of the prepared tooth is made, which is then sent to a dental lab for the custom fabrication of your veneer. This can be accomplished in some cases with a digital scan of the teeth.
Step 4: Placement of Temporary Veneers
The temporary veneer process is an essential step in the placement of dental porcelain veneers. While the permanent veneers are being custom-made, temporary veneers are created. These temporary veneers are typically made from composite resin and are designed to provide basic protection and aesthetics during the interim period. The dentist carefully shapes and bonds the temporary veneers to the prepared teeth.
The temporary veneers may not precisely match the final veneers in terms of color and shape but are designed to provide a reasonably natural appearance. They also help protect the prepared teeth and ensure that the patient can eat and speak comfortably.
Temporary veneers serve as a crucial bridge between the initial tooth preparation and the placement of the permanent veneers, helping to maintain the patient's smile and oral function while the custom veneers are being crafted.
Step 5: Evaluating the Fit of the Dental Veneer
Before bonding the veneer in place, your dentist will ensure that it fits correctly, looks natural, and aligns with your bite.
Step 6: Bonding the Dental Veneer to the Tooth
Once the fit and appearance are confirmed, the veneer is bonded to the tooth using a strong adhesive. After the bonding process, the veneer is polished to perfection.
As with any dental procedure, you may have some questions about the dental veneers process. Here are a few common queries and their answers: